Uncategorized
Cybersecurity
Iptv

As security researchers, we are constantly under threat. The nature of our curiosities lead us down dark cyber paths that require meticulous processes to come out of unnoticed. Additionally, for those who dig deeply into malware and criminal activity online, that requirement becomes central for safety. Accordingly, a seasoned security researcher ought to have the defenses in place that keep them safe from intruders or even more likely, mistakes!
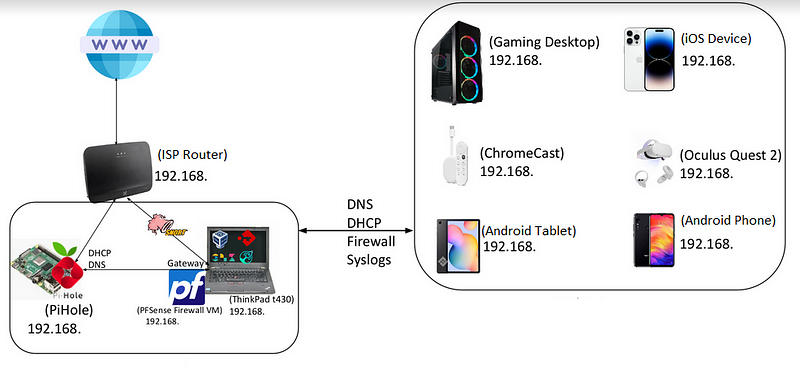
My initial set-up to maintain my defenses at home was modest, but robust. It ran entirely on a Raspberry pi and a Thinkpad T430, which ran on an i5 processor with 12GB of ram and 250GB of space. However, having only one network card limited my expansion of that device, plateauing at a few network functions; primarily DNS filtering, DHCP, fire-walling, IDS/IPS and a sometimes functional Splunk SIEM (This was a ram hog, hardly possible on 12GB), so I opted for a free cloud Grafana instance, now on the path to be replaced by Wazuh.
But it wasn’t long before I found a fixer-upper that caught my eye that could fulfill many more of my required use-cases, and an upgrade was born.
The cornerstone of my home lab upgrade was the acquisition of a second-hand HP Z400 Workstation. This workstation, though older, possessed the potential to significantly enhance my home defense setup. Let’s delve into its specifications and capabilities:

The HP Z400 Workstation, now equipped with the upgraded 6-core, 12-thread Intel X5670 processor and expanded to 32GB of ECC Unbuffered RAM (thanks to a BIOS upgrade), was the ideal candidate to enhance my home lab’s capabilities.

With the HP Z400 Workstation serving as the backbone of my upgraded home lab, the next step in my journey was to implement a robust hypervisor to maximize the workstation’s capabilities. After thorough research and consideration, I chose to install Proxmox Virtual Environment (Proxmox VE) as my hypervisor of choice.
Proxmox VE is an open-source virtualization platform that combines two powerful virtualization technologies: KVM (Kernel-based Virtual Machine) for virtual machines (VMs) and LXC (Linux Containers) for lightweight container-based virtualization. Here’s why Proxmox VE was the ideal choice for my home lab:
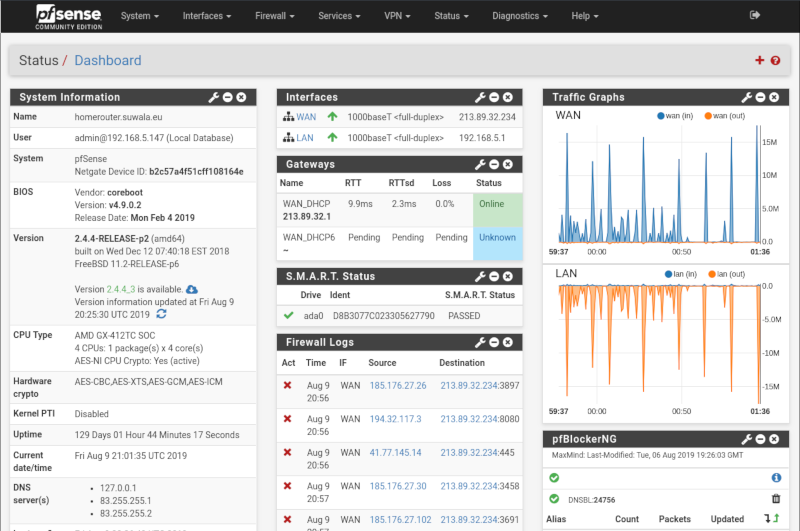
One of the primary use-cases for my upgraded home lab was to create a secure and customizable network environment. For this purpose, I decided to virtualize pfSense, a powerful open-source firewall and routing platform. With Proxmox VE, I could allocate dedicated resources to pfSense, ensuring optimal performance. Here’s how I set it up:
In addition to securing my network, I also aimed to enhance privacy and productivity within my home lab environment. To achieve this, I virtualized two essential services:
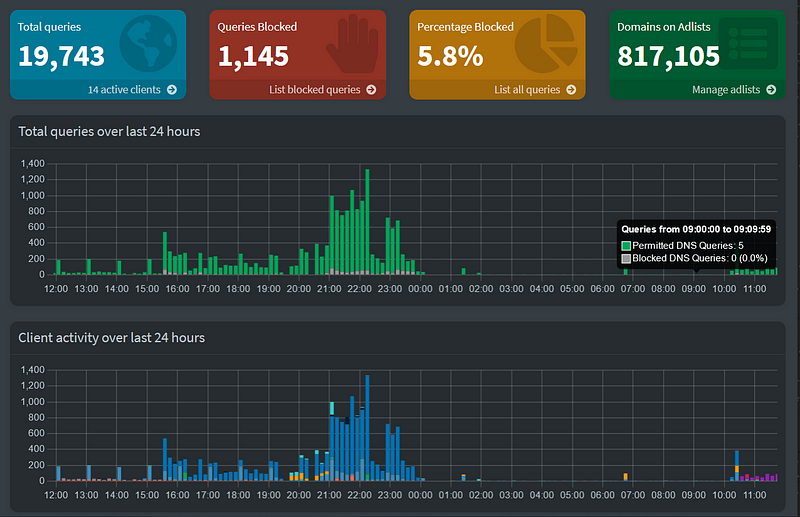
With Proxmox VE as the foundation of my virtualized home lab, I could easily manage and scale these services, ensuring that my network was not only secure but also optimized for productivity and privacy.
I recognized the need for a versatile environment to facilitate learning and testing various operating systems and security scenarios (and a justification for the unholy amounts of ram I’ve invested in). Proxmox VE proved to be the ideal platform for this purpose, enabling the virtualization of multiple operating systems to meet diverse security and privacy requirements.
Kali Linux: To explore and experiment with the latest penetration testing tools and techniques, I created a dedicated Kali Linux virtual machine. This allowed me to conduct ethical hacking exercises, vulnerability assessments, and security audits within a controlled environment.
Windows: The need for a Windows environment for compatibility testing and analysis was paramount. Through Proxmox VE, I provisioned a Windows virtual machine, offering a versatile space to assess software, examine security configurations, and explore the intricacies of Windows-based attacks and defenses.
Whonix Gateway and Deep Web VM: Recognizing the importance of anonymity and privacy in certain research endeavors, I introduced the Whonix Gateway into my lab setup. This dedicated gateway, coupled with a virtual machine designed for deep web exploration, provided me with a secure and anonymized environment for navigating the onion network and wider clear-net.
Vulnerabe Machines: As a security researcher, hands-on experience with real-world vulnerabilities is invaluable. By downloading images from https://www.vulnhub.com/ I can set up a series of dedicated vulnerability machines, each hosting specific challenges and exploits for testing and skill enhancement. This dynamic environment enables me to sharpen my understanding of vulnerabilities and practice responsible disclosure.
I can go on and on about the technologies this enables. With Proxmox VE’s flexibility and robust management capabilities, I could effortlessly create, clone, and manage these virtualized operating systems, tailoring my lab environment to suit each unique learning and testing scenario. This versatility not only enriched my knowledge but also empowered me to adapt and respond effectively to the ever-evolving landscape of cybersecurity challenges.
In my quest for a highly organized and secure network environment, I embarked on a journey to enhance my network infrastructure. To achieve this goal, I made the strategic decision to install OpenWRT on my TP-Link TL-WA801ND, a pivotal component of my network setup. This transformation was instrumental in taking my network to the next level of customization and security.
Device Selection and Importance: The TP-Link TL-WA801ND, known for its reliability and versatility, was chosen as a cornerstone of my network architecture. Its selection was based on its ability to handle OpenWRT, an open-source firmware known for its advanced features and robust security options. With this device in place, I was ready to create a network environment tailored to my specific needs.
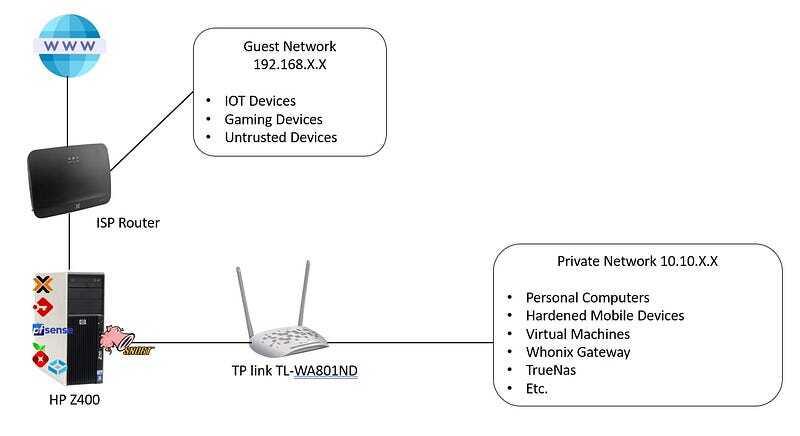
Segregation for Enhanced Security: One of the primary objectives of this upgrade was to establish a segregated VLAN (Virtual Local Area Network) dedicated exclusively to guest and untrusted devices. This deliberate segregation was implemented to maintain the integrity and security of my primary network. By isolating these devices in a separate VLAN, I could ensure that any potential threats or breaches would be contained, preventing them from affecting my core network.
Role of pfSense in Network Security: To further fortify my network’s defensive capabilities, I had meticulously configured pfSense, a powerful open-source firewall and routing platform. This robust software was entrusted with the critical task of monitoring and protecting the newly created secondary network, where guest and untrusted devices resided. PfSense’s advanced features and intrusion detection capabilities allowed me to keep a vigilant eye on this segregated network, promptly identifying and mitigating any security risks that might emerge.
My home lab odyssey began with a modest yet resilient setup, anchored by my trusty Lenovo T430 laptop. However, the limitations of a single network card prompted me to seek a more versatile solution. It wasn’t long before my quest led me to the remarkable HP Z400 Workstation, a second-hand gem brimming with untapped potential.
As my home lab continues to evolve, several upgrades are under consideration:
In the ever-evolving landscape of security research, adaptability and continuous improvement are imperative. My home lab is an ongoing project of fortifying defenses, expanding capabilities, and enabling experimentation safely within a safe-guarded environment.